Showing posts with label dessert. Show all posts

Wednesday, July 24, 2013

Nectarine Cupcakes with Cream Cheese Frosting


Someone recently asked me if I was still blogging here, a loving family member who knows of the existence of this blog but probably doesn't read it. I say that because if they had, they would have noticed my absence from this realm. This blog is supposed to highlight good, wholesome recipes I've tried and want to share. Throughout my pregnancy, I have tried desperately to cling to this mantra of good food, but the reality is very very boring. 

For the first few months I ate weird, gross or very bland food. (My favorite lunch at the time was an everything bagel with whipped cream cheese, siracha and chicken. I loved that so much.) I ate a lot of cereal, which I generally believe to be too processed to want to consume so regularly, but when it sounded good and helped with my nausea, I gave in and ate that Kashi every single day. 

My second trimester I felt better, but my energy never kicked back in. With the school year in full swing and testing anxiety, I relied a lot on Trader Joe's to help me out with dinners. I have a serious meat aversion with the pregnancy which means even more boring foods. Lots of salads, soups, and pastas. I started loving the premade salads at Trader Joe's for lunch every day- I'm still currently obsessed with their 'Crunchy Slaw' salad with the peanut dressing. Love. Even though it's summer and I ideally have time to make lunch, I still buy three of these a week and eat them for lunch on hot (ugh) days when I can't bring myself to make anything. 

Now that I'm 35 weeks along and due in a month, my eating hasn't changed much and my energy has only plummeted. But, I am on summer break which means even if I take forever, I can get some cooking done. The thing is that without meat to cook, I'm so bored. It's too hot to do anything too good with veggies (in my opinion, I'm so tired of grilling and sautéing) and if I never see pasta again I'll be ok. I feel like I'm living on cereal (still), fruit (adore!) and raw veggies (don't ask how many bags of baby carrots, plain old lettuce and bell peppers I'm going through a week. I'm setting records, I'm sure of it). Even sweets aren't very tempting, but baking... oh baking is my weakness. I've been baking at least weekly and sending them off with Dylan to work or freezing them for after the baby comes and we need some sugar. 


These cupcakes were one such baking bonanza. The nectarines I've been getting lately (from all sources: CSA box, grocery store, family's backyard) have been to die for. I realized recently that I had way more than I could eat, so I decided to do some baking with them. I chopped about seven of them up and slowly simmered them with a tiny bit of sugar and used them to make both these cupcakes and made some hand pies as well (these were killer. seriously, make them now. sorry I have no proof.)

I haven't felt like sharing these though, because I'm not sure how well they fit into my idea of 'good food'. They used processed ingredients and lots of sugar. But, I love baking. I find it to be extremely therapeutic and since I can't go for a long, sweaty run- baking is one of my best outlets. So, I'm sharing the baking. I realize this means my posts for what remains of the summer will be skewed in the sweet direction and I'm ok with that. It is what it is, right? If you've got a bbq to go to or a party to host, any of the sweet treats will make your guests sing your praises. So, bake on and share. Just don't eat them all at once or I'll feel just terrible (and frankly, so will you).


The recipe for these gorgeous little dandies can be found here, and I found them thanks to my favorite way to kill three hours, pinterest. 

Enjoy!
-m

Sunday, March 11, 2012

Carrot Cake Sandwich Cookies


A few years ago, I was telling a friend about a whole wheat pasta dish I had enjoyed and their remark took me by surprise. They asked why I would eat such a horrible tasting thing as whole wheat pasta. I tried to defend my desire for more whole grains but, while I knew there were countless health benefits, nothing other than "I need more fiber in my diet" came to mind.
They lamented that fact but suggested I just eat smaller portions of the 'good stuff'. The conversation has stuck in my mind and I have ruminated over this question since- Why eat whole grains if they supposedly taste worse? Why not simply eat less of the processed grains? I believe it boils down to your intended goal, lose weight or overall health? (The teacher in me really wants to type 'loose weight' and see who catches it, but the teacher in me also just can't type that on purpose)


I was only beginning my food explorations at the point that this conversation was held and I didn't know why, but I was already drawn to the unprocessed side of life. After the past year, I feel much more confident in my eating habits. While I'm no supermodel and that is not my purpose, I do strongly feel that the addition of whole grains to my meals was for the better.

There is research behind this as well, of course. Do you know the history of white flour? You might find this article interesting. Or the reason white flour has become so present in our daily eating lives? Shelf life seems to be the answer to so many of my over-processed food questions. Wheat flour has too many good things (vitamins and nutrients) that go bad much quicker than it's processed counterpart. Which seems to be one way that white flour became the norm.

Ease.
Convenience.

Seems like holding ease and convenience near and dear to our hearts has cost us dearly. If you are trying to eat healthier, then you are familiar with this struggle. It's so much easier to eat the processed foods, the pre-made dinners and the packaged cake mixes. I guess it's a struggle for a value you can't readily see, or that's how I view it. Time is valuable and while health is as well, it is a long haul and time is instantly gratifying. Does that make any sense?

I spend an hour every Sunday night chopping vegetables, making smoothies, getting food stuff ready for the week. A year ago, I spent that hour in other ways. Sometimes, when I'm beat and feeling lethargic, I lament my change in eating habits and crave that extra hour of laziness. But then I think ahead, what path will I be on if I take this step forward and change lanes from what I know is good for my body and mind overall, for what seems ok for my body and mind in the moment?

http://wallblank.com/products/food-with-thought
I feel like I'm still learning quite a bit when it comes to my food choices. Reading this book last summer, In Defense of Food, and participating in the October Unprocessed challenge have really guided me in what I believe to be the right direction. Have you heard of the pendulum swing as it relates to ideas and thoughts? In education, people are often referring the pendulum and how it affects our teaching. I can see this though, with our food choices now. I found the poster above, which is from World War 1, and thought it was something you'd see in a new foodie cookbook. How's that for things coming back around?

Anyway, that leads me to my recipe to share. As I do every year around this time, I made carrot cake. Last year the cake was all kinds of messed up and I made a trifle instead with the broken cake. I decided to make carrot cake sandwich cookies this year, sounded like fun!

The dough is sticky but firm after an hour cooling in the fridge.


But, as I was baking them I felt wracked with guilt. All that sugar. All that flour. While this is special occasion, there would be other deliicous meals to celebrate this special birthday, and this was the only one where I had control over the ingredients.

So, I did it. I swapped half the flour for whole wheat flour. I use raw sugar. And I used the recipe that called for 2 cups of oats. Whole grain-y! And I didn't tell a soul. Until they were eaten, then I spilled the beans because A) I can't keep secrets and B) I'm a horrible liar. I giggle like crazy. It's nothing too nutty, I get that, but I feel confident in my decision to attempt to make everything I create in my kitchen a bit better, anyway I can. (I do understand that I'm saying this as I share a cake recipe with a sugary crazy frosting. So be it! It's on my mind!)

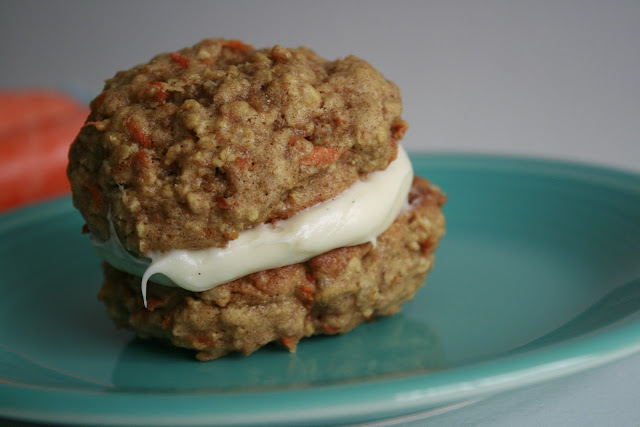
I just love the look of these, excuse the abundance of similar photos. I could not resist.


I promise that I'll share more non-baking related recipes soon. I've got a pan fried cod I'm digging and a broiled salmon that is simply rocking my socks, but for now, enjoy this little ditty.


Carrot Cake Sandwich Cookies with Whole Wheat Flour
adapted from Martha Stewart

ingredients

1 cup packed light-brown sugar
1 cup raw sugar
1/2 pound (2 sticks) unsalted butter, room temperature
2 large eggs, room temperature
1 teaspoon pure vanilla extract
1 cup all-purpose flour
1 cup whole wheat flour
1 teaspoon baking soda
1 teaspoon baking powder
1/4 teaspoon salt
1 teaspoon ground cinnamon
1/2 teaspoon ground nutmeg
1/2 teaspoon ground ginger
2 cups old-fashioned rolled oats
1 1/2 cups finely grated carrots, (about 3 large carrots)
8 ounces cream cheese, room temperature
8 tablespoons (1 stick) unsalted butter, cut into pieces, room temperature
1 1/2 cup confectioners' sugar
1 teaspoon pure vanilla extract


Combine sugars and butter in a medium sized bowl (you can use a mixer or do this by hand) and beat until light and fluffy, 3 to 4 minutes. Add eggs and vanilla, and beat until combined.
In a large bowl, sift together flour, baking soda, baking powder, salt, cinnamon, nutmeg, and ginger and stir to combine. Slowly add flour to butter mixture and continue to mix on a low speed until just blended. Mix in the oats and carrots and then chill dough in refrigerator for about an hour, or until it is firm.
Before you bake, preheat oven to 350 degrees. Line two baking sheets with parchment or grease with butter. These are sticky!

Using a ice-cream scoop, scoop dough onto prepared baking sheets. It's a good idea to leave 2 inches between cookies. Bake for 11 to 15 minutes. Transfer to a wire rack to cool. Prepare the frosting by mixing the cream cheese with the butter, followed by the sugar and vanilla. Adjust the sugar to your tastes/desired thickness.
Once cooled, spread about 2 teaspoons of cream-cheese filling onto a cookie. Squish this onto another cookie and repeat with the rest of the cookies. You can store them in an airtight container for a few days, but good luck with that! 

Enjoy!
-m

Wednesday, January 4, 2012

Peanut Butter and Dark Chocolate Bars


I'm filing a name change for these beauts, I no longer want these particular things to be called 'bars'. It seems oddly derogatory. They are so much more than a bar, they are just lovely. That's it. I want to rename them 'Peanut Butter Lovelies'. Yes, please. 


I didn't set out to make Peanut Butter Lovelies (when you say it, you have to kind of swivel your head around and point your chin up a bit, they are just so lovely, now say it with me 'peanut butter lovelies'. yes yes.). I just wanted to make some cookies. I had peanut butter and this honking pound of chocolate and I thought, well why not make some of our favorite peanut butter chocolate chunk cookies?

Because I hate chopping chocolate, that's why not. It took me a few hours of hemming and hawing  (those are words, right? They look so ridiculous, just the way I probably do whilst saying 'peanut butter lovelies' just the way that I imagine John Cleese would) before I just decided to do it. I had recently had a bit of a chocolate/glass disaster that I was aiming to avoid, but I didn't let it stop me. No way, so what if I caused an inept glass bowl full of chocolate I had so willingly chopped to shatter to pieces on my stove and so what if I left the mess wrapped up in a garbage bag in the sink in the garage that caused a minor flood, psh, so what. No big deal.


I wish I had thought that. Instead I thought, good luck crazy. Then I started chopping chocolate and hating every minute of it. The catastrophist in me just sees the way the blade slips along the hard chocolate, hardly following my commands, and worries about my dainty fingers. I like to let my mind wander whenever I can and this is not one of those times. No way, chopping chocolate requires constant vigilance, of which I have very little. I'm easily distracted, so sue me.

I just want to take a nap on this. Who doesn't?


But these Peanut Butter Lovelies (now you have to use a British accent as well when you say it, come on! you know you want to!) were worth the effort. I didn't want to ball up a bunch of cookies, and so it became a large bar. The melted chocolate on the top was the kicker, the dark chocolate and peanut butter combination being one of my all time favorites. While I thoroughly enjoyed these lovelies, next time I'm adding pretzels. Yes, pretzels. To the top, right after I pour that divine chocolate over the pillowy cooked cookie dough. You should try that, and let me know just how amazing it is.


Peanut Butter and Dark Chocolate Bars or Peanut Butter Lovelies
inspired by The Village Baker's Wife Peanut Butter Chocolate Chunk Cookies

print this recipe

ingredients

1 cup butter (two sticks) at room temperature
1 cup peanut butter (your choice!) room temperature
1 cup sugar
3/4 cup firmly packed brown sugar
2 eggs
1 teaspoon pure vanilla extract
2 cups all purpose flour
1 teaspoon baking soda
15-20 ounces of dark chocolate, cut into 1/2 in chunks (1 pound or so)
2 cups chopped pretzels (optional, highly suggested though not attempted)

Preheat the oven to 350 degrees, as usual. Like your 9 x 13 pan with parchment paper- you will thank yourself later for this step.

Cream the butter and peanut butter together, adding the sugars and mixing until it is all fully incorporated. Next, add the eggs one at a time followed by the vanilla.

In another bowl mix together the flour and baking soda. Gradually add this dry mixture to the wet mixture and combine until it is all gloriously intermingled. Toss in 1/3 of the chopped chocolate (about 5 ounces or 2/3 cup). Use a rubber spatula to clean down the sides of the bowl and make sure everything is mixed together well.

Now,  the best part and the reason I went with bars instead of cookies, dump the whole thing into the prepared pan and spread around with a butter knife or a spatula. Bake for 22-27 minutes, or until the edges are a nice golden color and a toothpick inserted comes out relatively clean (I prefer to under-bake my goodies so they retain their moist chewiness, which means that I let a few crumbs slide onto the toothpick and call it done, which was about 24 minutes in my kind of super hot oven).

Finally, take the leftover chocolate and melt it in a double boiler over simmering water until all the chocolate is melted. Then, pour the melted chocolate over the cooled bars, spreading it all evenly around as best you can. Here is my great idea I have yet to try, put crumbled pretzels on the top after you pour the chocolate- I imagine this would be divine! I'm going to try this next time. Let this chill in the fridge until the chocolate hardens, about 2 hours or pop them in the freezer if you need them faster. They are best cut up when the chocolate is hard, but closer to room temperature or it will crack. Cut up and serve at room temperature.

Enjoy!
-m


Thursday, December 22, 2011

Salted Caramel Bars


Happy Holidays!

I made these a few weeks ago, but the thought of them still makes my mouth water.

I hope your holidays went fabulously and that you are still reeling from it all.

Enjoy!
-m

Monday, December 12, 2011

blueberry compote

You know what might be insightful, entertaining and educational? If everyone (ok, not everyone, but a select few people) shared everything they googled in a one week period of time. I'll start, because I'm good at sharing, with a few of my recent queries:

filet au poivere (I was mid-sear, wondering what comes first to the pan for a good saucy meat au poivere- peppercorns or brandy, my keyboard must wince every time I hover above it, wooden spoon or spatula in hand. I'd like to say I was planning ahead, but leaving meat to sear on the pan while I dash to the computer to figure out what to do right after I take the meat off the hot pan, was not in fact good planning).

ranger doug WPA (looking for some more art-type-stuff for the house, we love these WPA posters)

salt dough (project for work. When I taught preschool, I was all over the cool crafts. Since moving to 6th grade though, I often forget to plan for the crafty stuff as I get overwhelmed with the fractions, figurative language and adolescent drama- but not this holiday season! This holiday season we are turning fractions and figurative language into a crafty project where they will double a recipe, make the dough, cut out shapes and otherwise decorate it, then write about the process. We are totally doing that. Mess and all. Bring it on.)

compote (this word has been rolling around in my mind every single time I make this blueberry dish I'm about to share and I finally looked the darn word up to see if what I was making qualified as a 'compote'. It totally does according to wikipedia. )

map of Europe (long story)

I've said this before, I'm sure of it, and I'll say it again. I have only the faintest idea what I'm doing in the kitchen. Unlike some amazing and lucky food bloggers, I have not been trained in any of the realms of cooking. I just have my insane curiosity and propensity towards trying new things. This is all one big learning experience. So, I hesitate to use fancy shmancy (or lovely, fabulous and apt) words to describe what I'm doing. Compote? What's a compote? Well, it looks as though it might just be fruit cooked in syrup. I'm totally doing that, thus I'm comfortable-ish saying that I'm making a blueberry compote.

I have been making this particular bit of bubbling blueberry beauty since October Unprocessed- it is simply blueberries and a splash of maple syrup. It is now a staple in my weekly diet, I make it every Monday and use a tablespoon of it in my oatmeal (which has been my smoothie substitute in these 37 degree California mornings), I eat a bit of it with some tea for my after dinner treat. I find that a little goes a long way and it is very satisfying. The whole recipe lasts me until Friday. What will I do when I can't find blueberries? Make applesauce, duh.

I imagine that if you liked ice cream, I do not, you could drizzle this over some vanilla bean and call it a day. I do like a splash of cream on my blueberry compote when I'm feeling fancy, but ice cream is something I only really care for in a cone, on a hot day, walking down main street in Disneyland or along the boardwalk in Santa Cruz. I'm just crazy that way.
little splash of milk..mm..


This blueberry compote is another easy, quick, fairly healthy little addition to a meal. What would you do with it? I think the possibilities are endless. I often make it as I'm preparing my Monday night meal, and have it simmering while I cook. It doesn't need much attention, its no needy middle child (sorry middle children, I'm stereotyping there, forgive me).

Blueberry Compote 
print this recipe

2 cups (or about 4 or 5 handfuls, no need to be too crazy precise here)
2-3 tablespoons (or a nice, mellow drizzle) of real maple syrup

Pour your blueberries into a small/medium saucepan and turn the heat up to medium/medium high. Drizzle the maple syrup over the berries and stir gently. Heat until the berries darken and start to burst, about 3-5 minutes, releasing their juices and making the whole kitchen smell amazing.

Turn the heat down to low/medium low and let it simmer for 10-15 minutes, or until the juice thickens and the berries get a bit wrinkly.

Ta-Da! It's all yours now, do with it as you please.

Enjoy!
-m


Saturday, November 12, 2011

Whole Wheat Chocolate Chip Cookies

I did that thing I'm not supposed to do.


I tried a new chocolate chip cookie recipe.


After October Unprocessed I was left curious about how I can make some of my favorite things less processed. I had tried to simply add whole wheat or raw sugar to other recipes and found that it doesn't always work that easily. Sometimes you need a recipe that is tailored to the new ingredients, so I turned to a cookbook I haven't used much but that I drool over often, Good to the Grain.


The only thing I wanted to change in the recipe was the sugar. I've been noticing that refined sugar makes me jittery and makes it hard for me to sleep, so I've been using raw sugar or honey whenever I can. This would be my grand experiment with these cookies- make them whole wheat, as the recipe suggests, but to change the sugars to raw sugar, honey and molasses.


The recipe calls for 1 cup of refined sugar and 1 cup of brown sugar. I used 1 cup of raw sugar and 1/4 cup of molasses and 1/4 cup of honey. I was worried about the moisture I was adding, more than I was worried about the flavors. That's why I started with the small amounts, 1/4 cup seemed small but also seemed like a lot of a much more viscous liquid than the sugars I was replacing.

Here I was, sitting in my kitchen doing math. I'm totally going to use this in a math lesson, as I do often. I bring in my recipes where I have halved or doubled a recipe and had to do real life math, adding fractions or converting them to decimals since me and fractions have a love/hate/super despise relationship. The kids always seem in awe of the chicken scratch pencil math above the recipes and the crumbs I so proudly leave in the crevices of my cookbook. It's fun. It's real.


The dough was much darker than your average cookie dough but it tasted amazing. The baked cookies were even more so. But the darkness of the dough did make it hard to identify when they were done in the oven, golden? They were golden to begin with! I went with a dark golden. I'm such a smarty pants with that one, eh? I actually always use the bottom of the cookies to tell when they are 'done'. I really really don't like crunchy cookies, so I just check the bottom of one cookie. If it looks golden, crispy and solid (as in, will provide a solid base as opposed to a floppy base) then they are done even if the tops looks less than done.


I wish I had made more. I want to have these around always. They were that good. Don't get me wrong, they were definitely a 'healthy' version of a cookie but they didn't taste like a cracker or a muffin (if you have ever attempted to convert any traditional recipe to a 'whole wheat' or healthy alternative I'm sure you'll know what I mean there- one time I tried to make whole wheat cookies and Dylan walked in the front door and asked me why I was making homemade cereal. That's just how it smelled, like I was making homemade bran flakes).
They were all cookie and all delicious. They were moist and chewy and the chunks of chocolate were just perfect. You can make them super large, 3 tablespoons of dough (!), or smaller, 1 tablespoon worked as well.


Even after a few days in an airtight container, they were still moist and tasty.

 
If you are looking for a healthy twist on a favorite, give these a try. I plan to include them in my cookie rotation.

Whole Wheat Cookies
adapted from Good to the Grain

click here for printable recipe

ingredients

3 cups whole wheat flour
1 1/2 tsps baking powder
1 tsp baking soda
8 ounces cold, unsalted butter, cut into 1/2-inch pieces
1 cup raw sugar
1/4 cup molasses
1/4 cup honey
2 eggs
2 teaspoons vanilla extract
8 ounces dark chocolate, cut into medium-large chunks (depending on what you prefer)

Preheat the oven to 350 degrees, line your baking sheets with parchment paper. In a medium bowl, mix all the dry ingredients together and set it aside.

Add the raw sugar and butter to the bowl of a mixer and mix on low speed until the mixture has blended. Turn the mixer on low and slowly add the honey and molasses, waiting until it is mixed together before adding each. Mix in the eggs and vanilla.

Add the flour to the wet mixture and stir until it is combined, then stir in the chocolate. The cookies were best when made large, about 3 tablespoons of dough, but also worked well with about 1 tablespoon of dough. Decide what size to make your cookie and drop the dough on the cookie sheets. Bake the large cookies for 14-18 minutes, and the smaller ones for 12-16 minutes. Keep your eye on them, pull them out when they are golden, but not dark, around the edges. I take them out before they seem done, when a finger pressed into the cookie leaves a little dent. but I'm crazy and love moist cookies.

They kept well for 3 days in an airtight container.

Enjoy!
-m

Monday, October 31, 2011

Caramel Apples


On Saturday, I had this bright idea for a lunch I was going to the next day. I had to bring a dessert and I was trying to find one that would be fun, festive and not too time consuming. I decided on caramel apples- probably because they seemed so easy and kind of gorgeous. Nevermind the fact that I didn't want to use the bagged/wrapped/premade caramel or that I had never even eaten one before and had no clue what consistency I needed the caramel to be at- I was excited, and when that happens with a recipe almost nothing can get in my way.

I scoured the internet looking for a caramel recipe that doesn't use corn syrup. That took about 30 minutes on it's own. Geez. I settled on an Ina Garten caramel sauce recipe. I started to make it, then frantically thought- is caramel sauce the same stuff you dip apples into?? If my google toolbar could speak, it would seriously laugh at all the silly food related questions I type in. I'm still learning! Give me a break, google toolbar!

These apples were a labor of love. They took a good long time. I learned a lot- and I think anyone can make them, seriously. Just live and learn from my mistakes.

You start by choosing your weapon- sugar. I used raw sugar, as it is still October Unprocessed and all that. I love the look of those gargantuan sugar crystals. Glory glory!

The next part was my favorite, it was easy and relatively hard to mess up (in my opinion..). You mix the sugar and the water on low and let it dissolve. Because I used a different type of sugar, this process took longer than the recipe suggested. About 1/3 longer, but I was patient at this point.

As the sugar was dissolving, I decided to really get my act together and mix my cream and vanilla and have it waiting in the wings. I love mixing any milk with vanilla for a recipe- it smells so lovely and homey.

After the sugar dissolved, crank up the heat and step away. Let it boil, but resist the urge to stir. You can slowly wiggle the pot around, swirling the bubbling sugar around, but do not stir. (Why? I googled it, but got distracted, I'm thinking that I might make two batches next time- one where I stir the heck out of it and one where I just swirl..).

While that bubbled, I washed up my apples in very  hot water and scrubbed them with a dish towel. I imagine they enjoyed that.

After the caramel reaches about 350 degrees, or it has a warm chestnut but dark color to it (expect it to be darker than normal if you used raw sugar), add the cream/vanilla mixture. The caramel will harden and you will freak out that you have failed miserably- but this is normal. It should do this. Relax. Simmer it on low heat until it comes together.

Odd looking, but totally normal, hardened caramel waiting to be mixed with the cream. It will soon look like..
this! But this is too light for a caramel apple..

This is where my 'learning' happened. I did this too soon. I made sauce and it never hardened. I had to reheat my caramel, bring it to boiling and watch this bubbling all over again. Here's what I feel like I learned- look at the bubbles on the edge of the pot. Watch how they burst against your pan, I wanted them to be thick and ooey gooey, and once my bubbles were leaving thicker patterns of burst bubbles, I turned off the heat. If you want caramel sauce, then relax at a warm chestnut color- if you want to dip or make harder caramels, wait a bit and look at those bubbles.

If you want sauce- here is the color you are looking for! Gorgeous! It was very, very good caramel sauce. If I wanted caramel sauce, I would have been thrilled. But I was not. And, having never eaten a caramel apple before I still dipped the darn apples into this sauce! I thought it seemed legit! I was wrong. The caramel never stuck- it stayed on but would wipe off on my finger. I was SO frustrated. We had to leave for a bit, so I was stuck pondering my disaster for hours. When we came home, I decided that I need to get some of the moisture to evaporate by heating it up more (after googling 'what to do when...' without any luck). I boiled it and waited anxiously for those ooey gooey bubbles.


It worked! I dipped my only remaining apples, these little guys, and set them in the fridge overnight. There's a chance I was up until midnight trying to figure this thing out. The next morning, I melted some dark chocolate and drizzled away. Wait for them to get to room temperature before enjoying, but don't let them get too warm! They get a bit ooey gooey then.

As my first caramel apple experience, these were startlingly good. I really enjoyed them! No wonder people dip apples in this stuff, it's fantastic combination. The chewy caramel is so satisfying set against the juicy apple. Divine!


Caramel Apples 
adapted from Ina Garten

ingredients

1 1/2 cups raw sugar
1/3 cup water
1 1/4 cup heavy cream
1/2 teaspoon vanilla
dark chocolate for drizzling

Wash your apples in hot water and scrub with a dish towel. Shove a stick in each of them- I used lollipop sticks- so they are ready to go. Place some wax paper on a dish and spray with cooking spray to keep the caramel from sticking later on.

Mix the sugar and water in a heavy-bottomed sauce pan and turn the heat on low. Cook until the sugar has dissolved. Get the cream and vanilla ready.

Turn the heat up to medium and boil, no stirring, until it turns a dark chestnut color. Swirl the pan around to mix. Watch it very carefully, as it can burn quickly. You are aiming for 350 degrees on a candy thermometer. Turn off the heat when you get the consistency and color you desire, then stand back and pour in the milk and vanilla. It will bubble like crazy and the caramel will harden but fear not, simmer it on low heat until it comes together, about 2 minutes.

Let it cool slightly, just a minute or so, and begin dipping your apples and placing them on the prepared wax paper.

If you want to drizzle with chocolate, melt some in a glass bowl in the microwave. Pour it into a small ziploc bag and snip off the end of the bag. Drizzle away! I placed the apple on an upside cup to hold them steady.

Enjoy!
-m

Thursday, September 29, 2011

Orange Chiffon Cake


When I was in high school I thought that the worst thing ever, well not 'ever' but a pretty horrible thing in my juvenile mind, would be to get stuck in a rut. I can get bored pretty easily and I was worried that I'd get older and become stuck, stuck, stuck in a rut. In my mind at that time, a rut was a patterned behavior day in and day out that was so monotonous and dry. As an adult, I crave routine and wonder if my high school self would be baffled that I eat the same breakfast every single day. I don't wonder about it for too long because I love my breakfast smoothie.

My egg separation station.
But it is still a fear of mine, to wake up in 50 years and think I have taken what I deem to be the 'easy' road, without much adventure or challenge. I know that won't be the case, but I can still fret about it can't I? When I was recently planning a meal and needed to come up with a fabulous dessert, I realized that I'm stuck in a dessert rut. I make cookies. I make brownies. I make cupcakes. I make basic cakes. I decided it was time to get adventurous. What? Isn't making a new kind of cake what you think of as adventurous? Of course it is!

I diligently searched through my many baking cookbooks and came across this orange chiffon cake recipe. I read the list of ingredients and said "bingo! adventure, ho!"

Little did I know, that this was a crazy adventurous recipe (in my mind). I was thinking it would be easy peasy and while it was easy, it needed some serious attention and care. Something I sometimes lack. I had to whip egg whites into a meringue-like flurry, I had to fold said egg whites into a thick, orangey batter and I had to be gentle and kind to this delicate cake. I don't think of myself as someone with a gentle hand when it comes to cooking. I don't really do pretty stuff or plate things that nicely- I'm more about the taste than the look. This cake challenged me in many ways.


Be very quiet, I'm folding egg whites...
That being said, I want to make it again. Like, tomorrow. Or maybe today. It was killer. I can't remember ever having a cake as lovely as this. It was light and citrusy and it smelled so amazing. I want it right this very second. I will make this many, many times. I can tell.
Crumbly phase of the glaze

I love everything about this, including this fabulous nonstick pan I scored at Target.


I wish they made an 'orange chiffon cake' candle, because I miss this scent in my house already. 


Orange Chiffon Cake

Ingredients

Cake:
2 ¼ cups cake flour
1 ½ cups sugar
1 tablespoon baking powder
I teaspoon salt
½ cup vegetable oil
6 large egg yolks
¾ cup freshly squeezed orange juice
2 tablespoons minced orange zest
8 large egg whites

Glaze (and who are we kidding, this was a frosting):
6 tablespoons salted butter
2 tablespoons minced orange zest
3 cups confectioners’ sugar, sifted
2 tablespoons milk
1 teaspoon pure vanilla extract

Preheat the oven to 325 and be sure your 10inch tube/bundt pan will fit in the center rack. Butter and flour your pan.

Start by sifting the flour, ¾ cup of the sugar, baking powder and salt into a big ol’ mixing bowl (you’ll be sorry if you use a medium sized bowl, trust me).

Before you move onto the next mixing step, get out your eggs. Set up an egg separating station with a bowl for the soon-to-be-whipped egg whites (mine went straight into the mixer bowl) and a bowl for the egg yolks and another bowl for the egg shells. Separate 6 eggs, put the yolks aside and separate 2 more but get rid of the yolks (since you need 8 egg whites and 6 yolks, toss those extra yolks out or use them some other way-I cooked mine up for my pup).

In a much smaller mixing bowl, whisk the vegetable oil, egg yolks, orange juice and zest.

Mix the oil mixture into the dry ingredients, use a wooden spoon to mix until nice and smooth. Set this aside while you work with the egg whites.

Beat the egg whites using an electric mixer or your amazing biceps until they are foamy. Once they are foamy add the ¾ cup of sugar and continue mixing until the egg whites form stiff peaks and are gorgeously glossy.

Now, gently fold 1/3 of this mixture in with the orange batter. Then, continue to gently fold in the rest of the egg white, or meringue, mixture into the batter. At this point, the batter should hold it’s shape but seem light and fluffy- not runny.

Pour the batter into your pan and smooth the top.

Bake the cake for 50-60 minutes,  do not do not do not open that oven for 45 minutes or the world will end. Or at least, the fluffiness and delightful airiness of this cake will end. Just don’t do it. Just ignore it. Or turn that light on and stare, but keep that oven closed.

Take the cake out and let it cool on a cooling rack for an hour while you make the glaze-frosting.

To make the glaze-frosting, cream the butter and zest then add the confectioners sugar and continue mixing slowly. This little mixture will be oddly crumbly, add the milk and vanilla and continue mixing.

After the cake has cooled you can spread the glaze stuff all around. If you have an older tube pan, you might need to be very very gentle when taking the cake out of the pan. If you have a nonstick pan, it will just slide out like butter. I just got one, it’s nonstick and I’m in love.

You can store this cake at room temperature for 3 days. It won’t last that long, but you can, and if you’re making this for company I’d suggest making it way ahead of time but letting it sit out and look pretty when guests arrive.

Enjoy!
-m