I have made this baked pasta so many times in the past few months. It's such an easy little meal that provides us with many leftovers and makes a great dinner to give to a friend who might need it.
As I was making it again last week, I decided I should share it with you. I haven't cooked much lately, for a few reasons, and most of my attempts at cooking lately have left a lot to be desired (boring blueberry muffins, not worth sharing!) and this recipe seemed like an fun, quick thing to share.
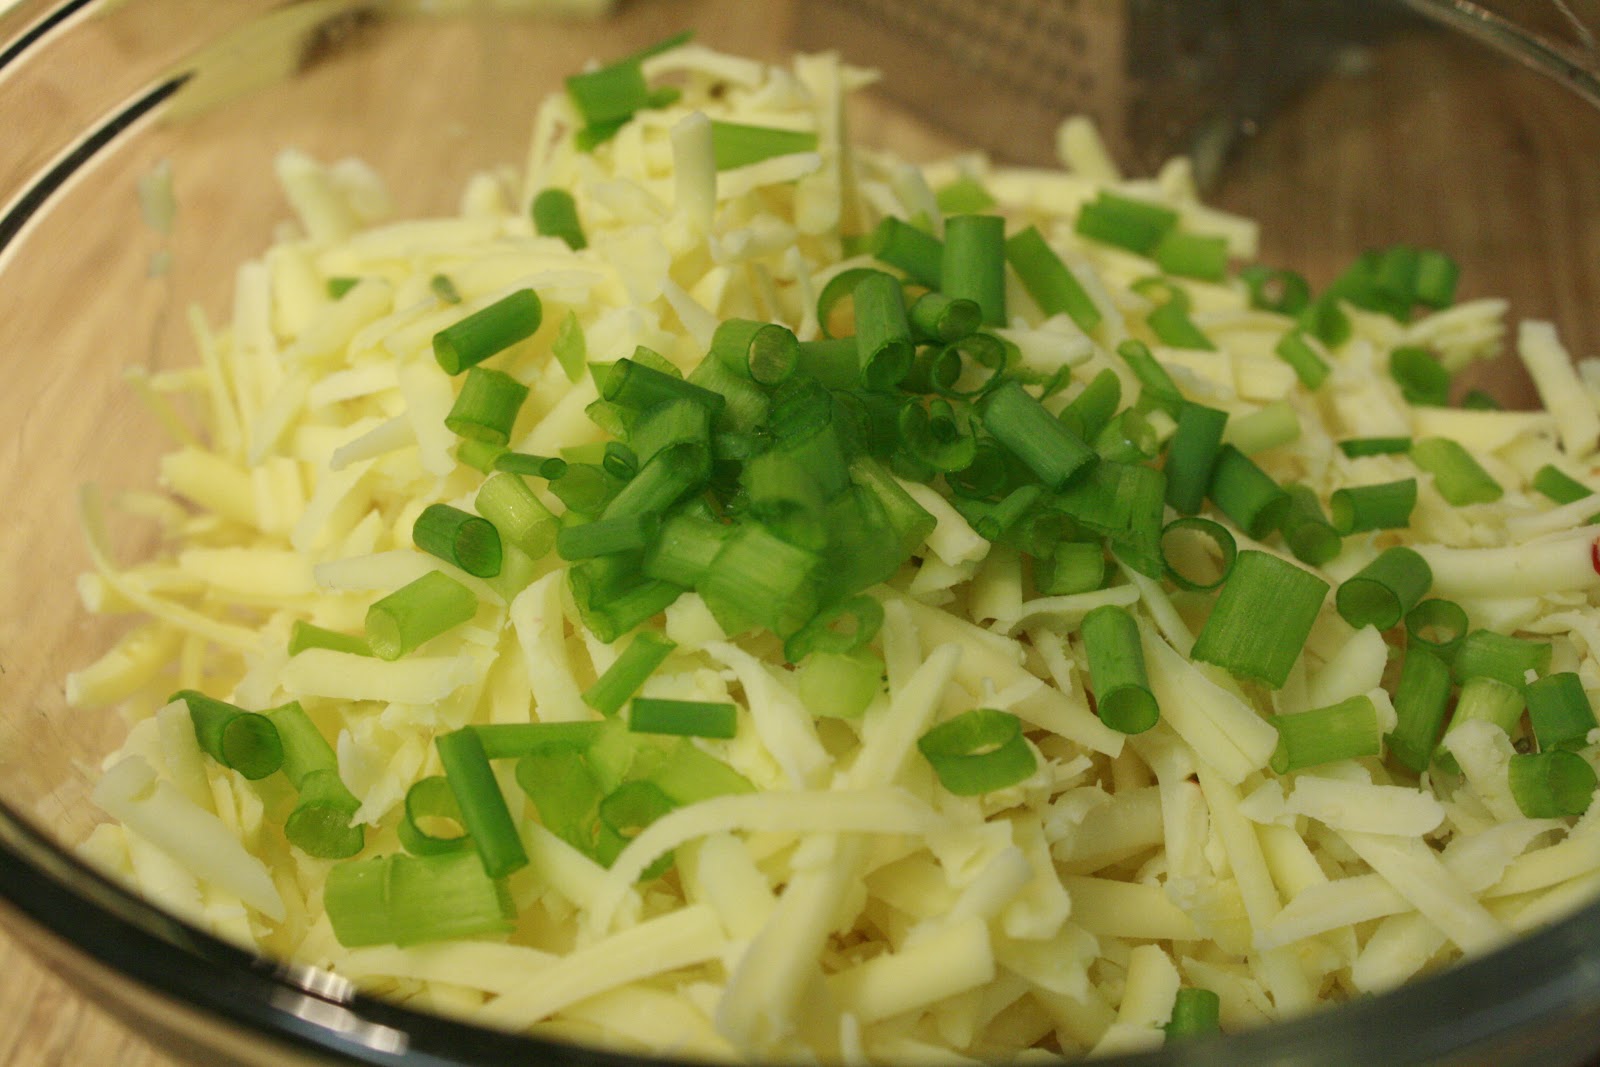
And then I did that thing I do. I did that thing, where I photograph the whole process. The shredding of the cheeses (mozerella and fontina), the browning of the ground meat (you could use turkey! I used beef) and the boiling of the pasta (but not too much, let the meat do the talking). I even got a shot of the whole thing mixed and piled into a baking dish that was headed for the oven.
Then, then it came out of the oven. It came out, glorious and bubbly. The salads were on the table, the drinks poured and the table set. And so it happened. I plated the pasta and ate a delicious, hearty meal, without ever stopping to photograph the best part, the finished product.
So, I guess you'll just have to make it yourself to see!
Baked Pasta
serves 4-6
time: 30-45 minutes
ingredients
1 jar of your favorite marinara sauce or homemade sauce if you're fancy like that
1 lb of ground beef (I'm sure turkey would work here too)
1 onion, chopped
1 tbsp olive oil
1/2 lb of pasta (adjust as desired, I prefer less pasta so that my sauce:pasta:meat ratio is where I like it)
1 cup grated mozzarella cheese (I add fontina and parmersan, depending on what I have on hand)
Begin by preheating your oven to 350 degrees and prepare a 9x11 pan by coating it with a light spritz of oil.
Cook pasta as usual; in a large pot- boil water, toss in pasta, cook for 8-10 minutes.
While pasta is cooking, drizzle the olive oil in a large pan and toss in the onions once the oil gets warm. Cook the onions for about 5-7 minutes, until they become translucent. Then place the meat in the pan and cook until browned. When the meat is done, pour the marinara sauce over it and let it simmer until the pasta is ready.
Drain the pasta and return it to the large pot, then combine the meat and sauce mixture with the pasta. Stir until evenly distributed and then mix about 1/3 of the cheese in the pasta mixture. Pour into the pan, sprinkling the rest of the cheese on top and bake for 25-30 minutes or until the cheese is melted and golden.
Enjoy! (and take a picture for me, would you?)
-m

Showing posts with label main dish. Show all posts
Showing posts with label main dish. Show all posts
Monday, February 18, 2013

Monday, March 26, 2012
Pan Fried Cod
 |
| Mmm.. lovely! Except that watery mashed cauliflower in the top right, ignore that mess. :) |
How much do I love this pan fried cod? Let me count the ways..
1) Almond flour, oh so fabulous and hearty and nutty and..well, fabulous. Don't be afraid of almond flour.
2) Butter! You can't go wrong with butter. Good, wholesome butter.
3) You can adjust the flavors to meet your particular fancy, I just love that.
4) Did I mention that I'm in awe of the almond flour? Because I was feeling mild trepidation towards covering some fish with ground up almonds, but fear not, it was delicious and more than holds a candle to a covered in white flour substitute. The almond flour has so much more substance, texture and flavor, I can hardly imagine using anything else at this point.
5) Did I mention the butter? because it deserves to be mentioned.
6) Guess what I will always have on hand from this point forward? Everything needed for this recipe.
Pan Fried Cod
adapted from Nourished Kitchen
serves 4
ingredients
3/4 cup almond flour
1/2 teaspoon sea salt
1/2 teaspoon paprika
1/2 teaspoon cayenne pepper (if desired)
1/2 teaspoon garlic powder
1/2 teaspoon onion powder
1 1/2 lbs cod filets
1 egg, beaten
butter, for frying (1/4-1/2 cup)
Mix together all the dry ingredients and put them in a bowl, big enough to dredge the filets in. You can use any seasonings you desire, I loved the cayenne pepper but you might not.
Dip the cod filets in the egg, then cover in the filet with the seasoned almond flour. Cover the whole thing, you'll want it all on every surface.
Melt the butter in a heavy bottomed skillet and fry the cod in the butter until cooked through and golden on both sides. Flip it once. This should take about 4 minutes per side, about.
Enjoy!
Thursday, December 29, 2011
Cheese Enchiladas
I have spent what feels like a very good amount of time lately at other people's houses cooking, eating and celebrating all kinds of wonderful things. It's been a hoot and while I'm totally exhausted (still) I came away with some interesting new insights. Really, I gained new, important, valuable, eye opening information whilst celebrating my holidays away.
This is what I mean about always learning, by the way. I'm completely enthralled with the act and idea of learning something new, no matter how inconsequential it may seem to anyone else. For example, I recently made tamales at a good friend's house. This is the same fabulously roomy (space! What a hot commodity!) kitchen that housed our Wednesday Thanksgiving this year and where I spent a good day making ninjabread men in ugly sweaters (see pic below if you don't believe me). I noticed the same thing on all occasions- cleaning as you go. It happens. Seriously, I saw it.

This is how it went down:
We prepped.
Then someone jumped in and washed everything we just used to prep. There were 4 or 5 of us, so those extra hands were nice, but on the day I was making cookies and just one other person was prepping and cooking wildly, then she did all the cleaning solo.
Then we cooked some of the previously prepped stuff.
Then, like magic, someone cleaned it all up!*
When we sat down to eat, everything was cleaned and the kitchen was immaculate. It was impressive, to say the least.
*Yes, sometimes it was me, but mostly it was not. I just stared in awe.
I have heard about such things occuring, but I have never experienced them myself (or I wasn't paying attention, my mom's kitchen never seemed messy but I was probably off in la-la land while all that cleaning occurred) I cook mostly at home, alone in my decently sized but relatively tiny kitchen and I just make one mess after another. It's kind of how I seem to roll through life, leaving organized chaos in my midst. I know where it all is, but it looks kinda nutty to the casual observer.
Dylan is always commenting on my ability to take a spotless kitchen and go all tasmanian devil on it with one fail swoop of my wooden spoon.
It's a bit demoralizing, really. I never want to cook after I've spent a good chunk of time scrubbing the kitchen down. And cooking is what I really love to do. It's quite a conundrum.

This is when my frozen meals really blow my mind. I have about twenty frozen soups and pastas ready for just this moment, when my kitchen looks great and I'm spent and I do not particularly like to get takeout or eat out on week nights. I used to throw down some delicious frozen meals from trader joes on nights like this, but I feel a little better about the stuff I make myself. We do the occasional gnocchi, no lie, but I know all the ingredients in my frozen potato leek soup and that soothes my weary soul (ha! weary. a bit dramatic, I know).
Here is one of our favorite meals I keep in the freezer. Just a note: it's such a fabulous recipe that I never get a chance to take a picture of the final result... how unsatisfying, I'm so very sorry. You'll just have to make it yourself to see what it looks like I guess. Then take a picture and send it to me so I have a frame of reference, ok?

These enchiladas were inspired by the Pioneer Woman's recipe for sour cream enchiladas. The only real change is the fact that I didn't like the ingredients in the enchilada sauce, so I made my own- dag nabbit.
I got this step, adding a bit of sauce to the mixture going in, from the custodian at my school. She gave me what is probably a killer enchilada recipe, but I haven't tried it yet because I'm so in love with this one. Soon! Soon.

By the way, I'm under no delusion that these are 'healthy'. They are super tasty and satisfying and a great treat for after you've rolled out all the sod for your backyard (finally! yes! That happened! And I made enchiladas to celebrate! I love exclamation points! and cheese.)
 Doing all these steps within the pan itself is genius and I thank my school custodian again for that tip. Makes so much sense! It's the kind of thing I might never ever think of myself.
Whenever I make these, I double the batch and make some more to freeze- though this batch makes two little 9x9 freezer trays pretty easily. This way, we never run out. Oh yeah. Enchiladas, always at hand. It's just how things work over here.

Cheese Enchiladas
serves 6 (or two very hungry people twice with leftovers!)
inspired by the Pioneer Woman's Sour Cream Enchiladas
print this recipe
ingredients
2 15oz cans of tomato sauce
1/4 cup vegetable oil
1 tablespoon+ chili powder (adjust to your taste)
1/2 tablespoon cumin
salt and pepper to taste
2 cups sour cream
2 1/2 - 3 cups grated cheese (cheddar or jack work well)
about 1 cup chopped scallions
12 corn tortillas (or a flour/corn hybrid- I love those)
Preheat the oven to 350 degrees. Get your 9x13 baking pan ready.
Put the two cans of tomato sauce in a medium sauce pan over medium high/medium heat. Add the oil and the seasonings and bring to a boil, then reduce to a simmer until the sauce retains that dark red color you know you're waiting for, about 10 minutes.
Mix the grated cheese, scallions and sour cream in a medium sized bowl. Add a dollop of the enchilada sauce and mix together.
Get your set up just right, I prefer to heat the tortillas up in the sauce as opposed to in oil, but you can use oil if you wish. I have a small frying pan loaded with some sauce heating up to about medium. Then I add the tortilla for a quick bath in the sauce, flip it over after about 15 seconds and then toss it in the 9 x 13 in pan, where you intend for it to end up, and fill it and roll it right in there. Continue with the rest of the enchiladas. Top with extra sauce and cheese and bake until the cheese is bubbly, 15-20 minutes.
Enjoy!
-m
 |
| lovely Christmas dinner table |
This is what I mean about always learning, by the way. I'm completely enthralled with the act and idea of learning something new, no matter how inconsequential it may seem to anyone else. For example, I recently made tamales at a good friend's house. This is the same fabulously roomy (space! What a hot commodity!) kitchen that housed our Wednesday Thanksgiving this year and where I spent a good day making ninjabread men in ugly sweaters (see pic below if you don't believe me). I noticed the same thing on all occasions- cleaning as you go. It happens. Seriously, I saw it.

This is how it went down:
We prepped.
Then someone jumped in and washed everything we just used to prep. There were 4 or 5 of us, so those extra hands were nice, but on the day I was making cookies and just one other person was prepping and cooking wildly, then she did all the cleaning solo.
Then we cooked some of the previously prepped stuff.
Then, like magic, someone cleaned it all up!*
When we sat down to eat, everything was cleaned and the kitchen was immaculate. It was impressive, to say the least.
*Yes, sometimes it was me, but mostly it was not. I just stared in awe.
 |
| ninja bread men in ugly sweaters |
I have heard about such things occuring, but I have never experienced them myself (or I wasn't paying attention, my mom's kitchen never seemed messy but I was probably off in la-la land while all that cleaning occurred) I cook mostly at home, alone in my decently sized but relatively tiny kitchen and I just make one mess after another. It's kind of how I seem to roll through life, leaving organized chaos in my midst. I know where it all is, but it looks kinda nutty to the casual observer.
Dylan is always commenting on my ability to take a spotless kitchen and go all tasmanian devil on it with one fail swoop of my wooden spoon.
It's a bit demoralizing, really. I never want to cook after I've spent a good chunk of time scrubbing the kitchen down. And cooking is what I really love to do. It's quite a conundrum.
This is when my frozen meals really blow my mind. I have about twenty frozen soups and pastas ready for just this moment, when my kitchen looks great and I'm spent and I do not particularly like to get takeout or eat out on week nights. I used to throw down some delicious frozen meals from trader joes on nights like this, but I feel a little better about the stuff I make myself. We do the occasional gnocchi, no lie, but I know all the ingredients in my frozen potato leek soup and that soothes my weary soul (ha! weary. a bit dramatic, I know).
 |
| homemade enchilada sauce |
Here is one of our favorite meals I keep in the freezer. Just a note: it's such a fabulous recipe that I never get a chance to take a picture of the final result... how unsatisfying, I'm so very sorry. You'll just have to make it yourself to see what it looks like I guess. Then take a picture and send it to me so I have a frame of reference, ok?

These enchiladas were inspired by the Pioneer Woman's recipe for sour cream enchiladas. The only real change is the fact that I didn't like the ingredients in the enchilada sauce, so I made my own- dag nabbit.
I got this step, adding a bit of sauce to the mixture going in, from the custodian at my school. She gave me what is probably a killer enchilada recipe, but I haven't tried it yet because I'm so in love with this one. Soon! Soon.

By the way, I'm under no delusion that these are 'healthy'. They are super tasty and satisfying and a great treat for after you've rolled out all the sod for your backyard (finally! yes! That happened! And I made enchiladas to celebrate! I love exclamation points! and cheese.)
Step by Step: Filling and rolling your enchiladas

Whenever I make these, I double the batch and make some more to freeze- though this batch makes two little 9x9 freezer trays pretty easily. This way, we never run out. Oh yeah. Enchiladas, always at hand. It's just how things work over here.

Cheese Enchiladas
serves 6 (or two very hungry people twice with leftovers!)
inspired by the Pioneer Woman's Sour Cream Enchiladas
print this recipe
ingredients
2 15oz cans of tomato sauce
1/4 cup vegetable oil
1 tablespoon+ chili powder (adjust to your taste)
1/2 tablespoon cumin
salt and pepper to taste
2 cups sour cream
2 1/2 - 3 cups grated cheese (cheddar or jack work well)
about 1 cup chopped scallions
12 corn tortillas (or a flour/corn hybrid- I love those)
Preheat the oven to 350 degrees. Get your 9x13 baking pan ready.
Put the two cans of tomato sauce in a medium sauce pan over medium high/medium heat. Add the oil and the seasonings and bring to a boil, then reduce to a simmer until the sauce retains that dark red color you know you're waiting for, about 10 minutes.
Mix the grated cheese, scallions and sour cream in a medium sized bowl. Add a dollop of the enchilada sauce and mix together.
Get your set up just right, I prefer to heat the tortillas up in the sauce as opposed to in oil, but you can use oil if you wish. I have a small frying pan loaded with some sauce heating up to about medium. Then I add the tortilla for a quick bath in the sauce, flip it over after about 15 seconds and then toss it in the 9 x 13 in pan, where you intend for it to end up, and fill it and roll it right in there. Continue with the rest of the enchiladas. Top with extra sauce and cheese and bake until the cheese is bubbly, 15-20 minutes.
Enjoy!
-m
Friday, November 25, 2011
Thanksgiving Wrap Up
The Highlights:
Cider-Glazed Turkey from Food and Wine magazine: This was an amazing turkey. I especially loved the butter soaked cheesecloth that was draped over the turkey prior to cooking and remained there until we pulled it out of the oven. Peeling the cheesecloth off the bird and revealing a perfectly cooked, brown, crispy, gorgeous turkey was just about the most exciting thing ever. No, really. We 'oohed' and 'awed' very loudly. Gorgeous and delicious, this recipe is a keeper.
Lemony Mushroom and Pine Nut Stuffing Muffins from Food and Wine magazine (say that 5 times fast!): Brioche, cream, lemon juice, toasted pine nuts, a multitude of mushrooms and a splash of stock make this an amazing stuffing recipe. The muffin idea is a cute one, but not super practical. I made two batches of this; one was cooked too long (45 minutes- too long!) but the muffins stayed together when removed from the pan, the other was cooked just long enough (35 minutes- perfect!) but they fell apart very easily. I would make this again in a heartbeat, but I think I'd go more traditional. The novelty of the 'muffin' wore off quick.
Brie and Pear baked in Phyllo Dough: This was a recipe of a friends of a friends, or a family member of a friend of a friends, I'm not sure but it was amazing. So simple, and a soon to be staple- I can just see it. It's quite simple, if I'm remembering it correctly, cut up a pear or two, saute in a few tablespoons of brown sugar and butter. Put a bit of brie (triangle, circle, whatever) in the center of the phyllo dough sheets, pour the pear/sugar/gorgeousness on top and fold the dough over it. Bake until brown and melty inside. This was heavenly.We gobbled it up with crackers in what seemed like seconds.

Candied Mandarin Oranges and Cranberries from Bon Appetit: Hm. I loved the idea of this recipe, but in reality it wasn't so great. The issue I had was with the oranges- I couldn't get them to carmelize in the oven. Seriously. They had been under the broiler for 10 minutes and nothing, could have been user error. Also, the center of the oranges were tough and hard to eat. I would just use pieces of oranges instead of the whole thing next time, even if it is not as gorgeous. The cranberries cooked in the orange syrup were my favorite part- I saved them and served them the next day with some cheese and crackers. I had planned to photograph this entire recipe, and I did, but since it was hardly what I think of as a success, I won't be sharing it. I wish I had taken the time to photograph the stuffing! Darn.
Pecan, Bourbon, and Butterscotch Bread Pudding from Bon Appetit: Wow. That's all I can say here. Wow. This was such a winner. I'm making this again, and soon. I have to share the whole process, it's just too easy and delicious not to. You prepare the bread pudding the night before, which makes it super easy the day of. The butterscotch sauce is so easy and a perfect addition to the bread pudding. The poppy seeds add a touch of interest to the look- you know bread pudding can be kind of.. odd looking. The flavors in this were so fabulous- the vanilla bean especially. Try it!
There were many other amazing food offerings- pecan tarts, brussel sprouts and bacon, cake pops, spice cake, potato gratin and cheesy mashed potatoes- but these were the ones that especially stood out to me. I want to remember these for next year! Anything you especially enjoyed about your turkey day? Share! :)
Enjoy
-m
Cider-Glazed Turkey from Food and Wine magazine: This was an amazing turkey. I especially loved the butter soaked cheesecloth that was draped over the turkey prior to cooking and remained there until we pulled it out of the oven. Peeling the cheesecloth off the bird and revealing a perfectly cooked, brown, crispy, gorgeous turkey was just about the most exciting thing ever. No, really. We 'oohed' and 'awed' very loudly. Gorgeous and delicious, this recipe is a keeper.
 |
| slightly overcooked but delicious stuffing muffins |
Lemony Mushroom and Pine Nut Stuffing Muffins from Food and Wine magazine (say that 5 times fast!): Brioche, cream, lemon juice, toasted pine nuts, a multitude of mushrooms and a splash of stock make this an amazing stuffing recipe. The muffin idea is a cute one, but not super practical. I made two batches of this; one was cooked too long (45 minutes- too long!) but the muffins stayed together when removed from the pan, the other was cooked just long enough (35 minutes- perfect!) but they fell apart very easily. I would make this again in a heartbeat, but I think I'd go more traditional. The novelty of the 'muffin' wore off quick.
Brie and Pear baked in Phyllo Dough: This was a recipe of a friends of a friends, or a family member of a friend of a friends, I'm not sure but it was amazing. So simple, and a soon to be staple- I can just see it. It's quite simple, if I'm remembering it correctly, cut up a pear or two, saute in a few tablespoons of brown sugar and butter. Put a bit of brie (triangle, circle, whatever) in the center of the phyllo dough sheets, pour the pear/sugar/gorgeousness on top and fold the dough over it. Bake until brown and melty inside. This was heavenly.We gobbled it up with crackers in what seemed like seconds.

Candied Mandarin Oranges and Cranberries from Bon Appetit: Hm. I loved the idea of this recipe, but in reality it wasn't so great. The issue I had was with the oranges- I couldn't get them to carmelize in the oven. Seriously. They had been under the broiler for 10 minutes and nothing, could have been user error. Also, the center of the oranges were tough and hard to eat. I would just use pieces of oranges instead of the whole thing next time, even if it is not as gorgeous. The cranberries cooked in the orange syrup were my favorite part- I saved them and served them the next day with some cheese and crackers. I had planned to photograph this entire recipe, and I did, but since it was hardly what I think of as a success, I won't be sharing it. I wish I had taken the time to photograph the stuffing! Darn.
Pecan, Bourbon, and Butterscotch Bread Pudding from Bon Appetit: Wow. That's all I can say here. Wow. This was such a winner. I'm making this again, and soon. I have to share the whole process, it's just too easy and delicious not to. You prepare the bread pudding the night before, which makes it super easy the day of. The butterscotch sauce is so easy and a perfect addition to the bread pudding. The poppy seeds add a touch of interest to the look- you know bread pudding can be kind of.. odd looking. The flavors in this were so fabulous- the vanilla bean especially. Try it!
 |
| pecan tarts! |
There were many other amazing food offerings- pecan tarts, brussel sprouts and bacon, cake pops, spice cake, potato gratin and cheesy mashed potatoes- but these were the ones that especially stood out to me. I want to remember these for next year! Anything you especially enjoyed about your turkey day? Share! :)
Enjoy
-m
Saturday, September 24, 2011
Braised Short Ribs


When I decided on braised short ribs I had no clue how much I would love them. No stinkin' clue. I didn't even realize until I bought the meat, that I had never even eaten this particular cut of meat before. What in the world is that about? How is that possible? If you fall into that category- you must make these or beg someone else to make them for you this fall/winter!


Braised Short Ribs
from The Pioneer Woman
Ingredients
8 whole beef
short ribs
Kosher salt
and pepper to taste
1/4 cup
flour
6 pieces
pancetta, diced
2 tbsps
olive oil
1 medium
onion, diced
3 carrots,
diced
2 shallots, peeled and finely minced
2 cups wine
(red or white)
2 cups beef
or chicken broth (enough to pretty much cover the ribs)
2 sprigs
thyme (don’t you love the word ‘sprig’?)
2 sprigs
rosemary
Preparation
Instructions
Salt and pepper ribs, then dredge-or
roll around-in flour. Casually set them off to the side, as if it’s totally
normal to have such wonderful meat in your midst.
In a large dutch oven, cook the
diced pancetta over medium heat until complete crispy and all fat is rendered.
Take the pancetta out of the pot and save it for later. Also- Also!- save that
grease in the pan.
Add olive oil to pan with the
pancetta grease, and raise heat to high. Brown ribs on all sides, and the
orignal recipe suggest they could brown up in 45 seconds but I say just go with
your eyes and nose. You’ll be able to smell them browning up and see it like
crazy. I brown them in batches, setting the browned ribs on a plate while I
transfer the dredged ones into the hot pan. When you are done browning them all
up, turn the heat to medium.
Add onions, carrots, and shallots to
pan and cook for just a few minutes. Pour in wine and scrape bottom of pan to
release the good stuff from the bottom of the pan. Right now you are so glad
that you used that pancetta earlier, aren’t you? Bring all the goodness to a
boil and cook 2 minutes.
Now add the broth to cover the ribs,
1 teaspoon kosher salt, and plenty of freshly ground black pepper. Taste and
adjust the seasoning as you like. Add the ribs to the liquid. They should be
almost completely submerged. Add thyme and rosemary sprigs (whole) to the
liquid.
Put on the lid and place the dutch
oven into the oven. Cook at 350 for 2 hours, then reduce heat to 325 and cook
for an additional 30 to 45 minutes. Ribs should be fork-tender and falling off
the bone. Remove pan from oven and allow to sit for a bit so you can remove a
bit of the fat from the top before you serve it. Pass on two ribs for each
person, great with mashed potatoes!
Enjoy!
-m
Subscribe to:
Posts (Atom)