Showing posts with label snacks. Show all posts

Sunday, May 6, 2012

Olive Oil Popcorn!


Sometimes the blog posts write themselves. I cook, I snap some pictures, I type a bit and boom. It's a fun process. Other times life gets stuck in what feels like a mad dash to some unseen finish line. In this mad dash I imagine I'm a horse, because I think horses look better running than I do, and I've got those horse blinders on, because it works for the metaphor. I seem to be stuck in a mad dash toward the end of the school year. I'm on hyper drive. Wait, that doesn't work with the horse thing. Oh well, I'm a sci-fy horse or something.

Either way, I'm neglecting my blog posts when I should be focusing on them most. It's not very balanced of me to be 99% work and 1% things that make me happy. And blogging makes me happy. It's a combination of the things I love to do in my free time: write, cook, eat and take pictures.

So, with that being said, here is one of my favorite things to make. It takes about 3 minutes total and gives you a great, healthy snack that everyone will want to gobble up.


We don't have a lot of stereotypical snack foods in our house. We rarely have crackers or chips but we do seem to crave some crunch once in a while. That is where this popcorn comes in handy. It is so very inexpensive (something like $2 for a bag that lasts us for months) and easy to make. I can't handle the chemical taste of microwave popcorn, so this popcorn is ideal.

I started making popcorn on the stove years ago when I was doing weight watchers. I wanted a healthy snack that was low points, and this olive oil popcorn seemed perfect. The only problem- I really stunk at making popcorn on the stove. It would end up chewy or burned. Gross.

After much trial and error, and asking anyone who would listen, I found a strategy that works for me. If I want popcorn for one, I use a small pot. If I want popcorn for a crowd, I use a stockpot. I usually use the big ol' pot and store the leftovers- they last all week. Here's the basic process:


I realized that my popcorn was getting chewy because I put the lid on right after turning on the heat, which was a mistake.  Now, I pour in the olive oil- enough to cover the bottom of the pan I'm using. I pour in the popcorn and mix it up with the olive oil. Then, I turn on the heat (high) and wiggle the pan around until the kernels turn golden. Once that happens, I put the lid on like this:


Also, I pick up the lid every ten seconds or so to release more of the steam. I leave the heat on for about 45-60 seconds. But not much longer, otherwise it will burn. Then I turn it off, let if sit for a minute or so and then take off the lid and pour it into a big bowl. I often toss a hot piece of sort of bland popcorn into my mouth at this point, and always regret it. Wait until you've seasoned it. I like to use olive oil spray and kosher salt. I spray and toss the salt on, then mix the popcorn around the large bowl. I may or may not do this a few times.


Now, time to eat it! If you are looking for a more hearty snack, mix in some trail mix (I love this) or you can use this popcorn to make any recipe calling for popcorn- caramel corn anyone? Or just leave as is for a great movie snack. Not gonna lie, I have snuck this into movie theaters. 


Olive Oil Popcorn

ingredients

olive oil
popcorn
kosher salt

Grab a large pan and drizzle enough olive oil to almost cover the bottom. Pour in the popcorn, just enough to form one layer on the bottom of the pan. Stir it around to cover each kernel in oil. Turn on the heat to high, leave the lid off, and wiggle the pan around to begin the cooking process. When all the kernels go from opaque to golden, you are ready for the lid. Put the lid on and let the popcorn pop. Release the steam frequently by lifting the lid up slightly.

Let the popcorn pop with the heat on for about 45-60 seconds, then turn off the heat and let it sit for a minute or so. Pour the cooked popcorn into a large bowl and spray with olive oil spray (lightly) and sprinkle with salt. Repeat this process one or two more times, depending on your seasoning preferences.

The leftover popcorn should last for up to 5 days in an air tight container. Makes a great snack for afternoons or with lunch!

Enjoy!
-m


Thursday, January 5, 2012

Homemade Soft Pretzels


 When I was a goofy little kid, my sisters and I used to beg for frozen soft pretzels. Or, I think we did, because every time I pass them in the freezer section of the grocery store I think 'I want! You can't have! I want! You can't have!'. 
Yes, sometimes we did slyly convince our parents to let us gobble some up. They were so satisfying and easy to heat up for a quick snack. It was such fun. Don't they remind you of a festival, theme park or other outdoor mildly summery gathering? They make me happy. Little bit of mustard, lots of napkins and a good sprinkling of salt and I'm in heaven. I love soft pretzels, but I had no idea how much I loved them until I had a fresh one at a farmers market a few years ago. Ever since then, those frozen ones haven't been on my mind at all. They don't tempt me the way they used to, not in the slightest. Nope. Not at all. (Am I convincing you?)

foamy yeast mixture

Then, last year, I found a recipe for them online and after reading through it, I decided that I had what it takes to make my very own soft pretzels from scratch. That first recipe was good, but it left me with an odd stomach ache and the pretzels weren't great the next day. I've been searching for a replacement ever since, and I have found it. I'm done searching. Hold off the hounds, here's the winner.


boiling- aren't those strange little bubbles?

If you are going to a super bowl party, or other festivities where major snacks are involved, I suggest you rock everyone's socks by making a batch of these. Seriously, everyone will think you are some sort of unicorn herding opera singer- that's how amazing they are! Don't tell me you wouldn't be impressed by that, or think it was unbelievable- because that is exactly what people will think when you bring these bad boys over! They won't believe you (hence the unicorns) and they will be amazed (hence the opera singing). My thinking totally makes sense now, doesn't it? Whip up a little cheese dip and you will have an absolute show stopper.
this is after their boil bath and before they were baked

Let me just mention this: These are way easy. Don't be fooled by the boiling step, it's easy peasy.

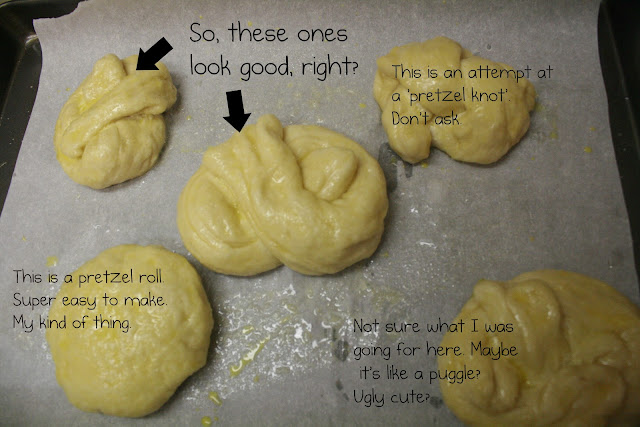
If you can mix some things, let them sit, kind of oddly fold things (or make pretzel sticks! Or pretzel bites! or what else? I'm dying to find other ways to use this recipe- I made pretzel rolls! Great for sandwiches or burgers!), toss said oddly folded things into boiling water for 30 seconds, take them out and bake them- then you are set. It's just that easy. I feel like I'm selling some cleaning product, but I don't know how else to say it- make. these. now. or at least soon. Then, thank me. Or thank Alton Brown, it is his fault after all.


Soft Pretzels
from Alton Brown 

ingredients

1 1/2 cups warm (110 to 115 degrees F) water
1 tablespoon sugar
2 teaspoons kosher salt
1 package active dry yeast
22 ounces all-purpose flour, approximately 4 1/2 cups
2 ounces unsalted butter, melted
Vegetable oil, for pan
10 cups water
2/3 cup baking soda
1 large egg yolk beaten with 1 tablespoon water
Pretzel salt (optional)

Mix the water, sugar and kosher salt in the bowl of a stand mixer, if you have one, and sprinkle the yeast on top. Let it sit for a bit, about 5 minutes, until it begins to foam. Then add the flour and butter and using the dough hook, mix it slowly until combined. (If you don't have stand mixer, no worries, mix it by hand! Work it!) Ramp it up to medium speed until the dough gets smooth and forms a ball- it should not be sticking to the sides of the bowl- about 4-5 minutes. Take the dough out and quickly clean the bowl, spray it with vegetable oil and return the dough to the bowl. Cover it with plastic wrap and put it in a warm place for about 50 minutes or until it has doubled in size. 

Now, preheat the oven to 450 degrees. Line two sheet pans with parchment paper and a little vegetable oil.

Put the water and the baking soda in a large saucepan and bring it to a boil. While you wait for this, start working with the dough on an oiled surface. Divide it into 8 equal pieces for large pretzels, 16 for mini pretzels. Make a U-shape with the dough, then cross over each end to connect with the opposite side. Or make pretzel sticks, or rolls, or bites. Whatever you please! Just adjust baking time if you do. 

Put the pretzels one by one into the boiling water for about 30 seconds each. Remove them using a slotted spoon or spatula and place them on the prepared sheet pans. Brush them with the egg yolk/water mixture and sprinkle with salt if you wish. Bake them until they are a dark brown color, about 12-14 minutes. Let cool for a few minutes before serving.

Enjoy!
-m