I feel like saying "What a week!" but that seems a bit dramatic seeing as how I took yesterday off to celebrate a certain someone's 30th birthday. We spent the day running seaside (me) and mountain biking (him), napping on the beach and watching the dog chase countless birds through the sandy shore (and flopping comically into deeper than she predicted waves and puddles).
Maybe I should say, I'm a bit physically tired. I've run almost 12 miles in the last three days, which is more than usual by Thursday. And Monday's yoga class completely obliterated my muscles, in a good way. My legs and my poor feet just need a day to sit and relax, and I'm planning on doing just that for a good portion of my Saturday.
For now, as I dream of my lazy Saturday, my hearty shepherd's pie is in the oven and I'm busy perusing the internet. I thought this might be just the perfect time to share some of my favorite things, links and otherwise.
1. I sincerely enjoy chopping mushrooms. I don't always love them in a dish, but preparing them is one of my favorite things. These shitake mushrooms were a pain to stem, but a joy to slice. They are firm and fresh feeling and way more fun than chopping chocolate. Bleh.
2. My apple corer/chopper has a new use- potato slicer! This works wonders and I just slice that weird core piece into two pieces and voila, homemade fries are done and ready to be baked! Or today, I peeled some potatoes and then ran them through the apple corer/chopper and then quickly chopped them for boiling. I love finding things like this to make my prep work easier!
I'm much more likely to cook wholesome foods if I can make the prep work more enjoyable and easier too. (But, as a note, don't be like me and chop your potatoes a day or two in advance and put them in a plastic baggie, yuck! I thought I was being so clever, but alas, I was not. Just chop before use or put them in a bowl with some water, they oxidize quite oddly- meaning- they turn a nasty brown color all over).
3. Speaking of saving time, I have been googling tips for storing my iphone headphoes for what feels like eternity, but has in fact only been a year or so. I get so frustrated trying to get them out of my bag all wound up around my sunglasses and pens. I have found a few ideas, but nothing I love as much as this one! I can't wait to give a try.
4. While I'm on the subject of iphones, (look at me segwaying like a pro! what what. Pro segway-er right here) I'm so very enthralled with this company's iphone cases. I want want want them all, especially their movie ones. This one is my all time favorite, I'm trying to convince myself to spend $35 dollars on it.. and not having much luck. Maybe next month!
5. Combining both the iphone stuff and the photos above comes my latest love, the app Snapseed. I got it for free a while back during one of those crazy 'get it while you can!' things and I love it. It's such fun for editing pictures I take on my phone. I'm considering using it for other fun photo editing on my laptop as well. We shall see!
Delightful and easy and sensationally tasty. If you'll indulge me, they smell vaguely tropical and have a kick of spice with each bite.
I don't have much of an anecdote to go with this post, other than to show you my new favorite blog/website Nourished Kitchen.
It fits so well with my latest obsession: unprocessed, whole, natural foods.
Trying to plan before the meal plans
I even signed up (and paid the measly $10 a month) for their weekly meal plans. Seriously, I did that. It's so easy. They email me three great dinner meals (meat + veggies+ a salad usually, or so it seems) and a few other tasty things like baked fruit or soups.
So far we have eaten pot roast, broiled salmon, roasted chicken, pan fried cod and steak (I see that is all the meat, but whoa, it's good meat and easy). I've roasted broccoli, carrots and all manner of veggies. I've made countless (well, 5) salad dressings that were easy and delicious. I feel like I'm being spoiled and I'm the one doing all the cooking.
This is how I used to meal plan for the week. Now, I just open an email and print.
Maybe this seems nutty, paying someone to send you a weeks worth of recipes. I can see that. But, I spend so much time each week planning the next weeks meals and with trying to slowly stop eating processed, foods finding recipes has been more and more challenging. This was such a great, easy, delicious solution.
These roasted carrots are just one of the reasons I feel this website was a great discovery. I've made them three times now, and the first time I made them we ate them all before dinner was even served.
8 carrots, scraped and sliced
1 tablespoon coconut oil, melted
1 tablespoon honey
zest of 1 orange
1/4 teaspoon crushed red pepper (or more, if you are crazy like me)
Preheat your oven to 425.
Toss the carrots with the oil, honey, orange zest and red pepper flakes. Spread onto a baking sheet (lined with foil or parchment paper for easy cleaning) and roast for about 30 minutes, stirring once.
About two years ago, I fell in love with roasted sweet potatoes. I
had been avoiding eating them ever since every single health related
magazine article said I just had to try this 'super food'. I prefer to
come to ideas on my own, or at least convince myself that I did.
What a goof, I know. I used to tell my high school tennis
coach that I enjoyed doing my backhand wrong. Yes, enjoyed. He would
come over and try to correct my form and I would resist. I'd tell him to go
away. And I wonder why I never did as well as I wanted to...
I firmly believed that eventually the right way would just miraculously
come to me with one swing and I would forever be relieved of my
wrongness. I see the error of my ways.. kind of. I'm still guilty of
this stubbornness on occasion. Case in point, I probably should have
tried sweet potatoes sooner.
Dates, dates, lovely dates. They add so much to these muffins!
I roast up a big bag of sweet potatoes fairly regularly, about
once or twice a month. I eat them sometimes with my smoothie for
breakfast, as an afternoon snack or with dinner. I just adore them.
Their flavor is amazing to me- the wonderful
not-quite-potato-more-like-squash texture and the natural sweetness.
They are incredibly satisfying.
So aesthetically pleasing, no?
I've done all this roasting, but rarely do anything else with
them. That's why this recipe has knocked my socks off something crazy.
I've made it three times. I love it, but at first I thought I'd be the only one.
Do you see the chunks of sweet potato? The little bits of orange there at the bottom and top? No? Trust me, it's the best part.
I made mini versions of it the first time I made them, to share
with some friends. They were gone so fast! Even when I said "whole wheat
sweet potato muffins with dates".
Seriously.
People didn't run away
screaming "What's wrong with you!?". I thought they might; the
ingredients can sound a tad bit strange on their own, but just imagine
each of those flavors mixed together and baked. Heavenly, eh? Well, so far, everyone I share these with just loves them.
These are great right out of the oven, but I usually make them
for breakfast/morning snacks for the week. Even my picky husband gobbles
them up, though I need to solve the 'sticks to the wrapper' problem as
it really drives him bonkers.
ingredients
1 cup whole wheat flour
1 cup all purpose flour
1 tablespoon cinnamon
1 teaspoon baking powder
1/2 teaspoon baking soda
1/2 teaspoon freshly grated nutmeg
1/4 teaspoon all spice
2 ounces (1/2 stick) unsalted cold butter
2 large roasted sweet potatoes, about 3/4 lb (I sometimes use 4 small ones if that's what I bought)
1/4 cup sugar (or raw sugar)
1/4 cup brown sugar
1 egg
1 cup buttermilk
1/2 cup plain yogurt or kefir
6 large medjool dates, pitted and chopped
Preheat the oven to 400 degrees. Roast sweet potatoes on a baking sheet covered with parchment or foil. Roast for 1-1.5 hours, depending on their size. The bottoms should be dark and almost burnt looking and the juices should be caramelizing. After they have cooled, peel them and leave them in tact.
Lower the oven to 350 and grease your muffin pan. Use muffin liners if you wish, though they stick sometimes to the paper cups.
Sift the dry ingredients together. In a small bowl, mix the buttermilk and yogurt.
Add the butters and the sugars to a medium sized bowl and mix either with a standing mixer or by hand. Mix until creamy, about 3 minutes. Add the egg and just half of the sweet potatoes (yes! just half!) and mix until combined. Scrape down the sides of the bowl. On low speed, add the dry ingredients until they are just partly combined. Follow this up by adding in the buttermilk mixture and mix until combined.
Add the dates and separate them over the surface so they don't all clump together. You want them spread throughout the batter. Next (my favorite part!), add the remaining sweet potatoes and mix until only barely combined- you want pockets of sweet potato in the batter. Scoop the batter into 10 muffin tins, skipping every other muffin cup if you want to keep the tops from touching as they bake.
Bake for 35-40 minutes, or until the bottoms are dark and tops are springy to the touch. The author of the cookbook suggests placing the muffins on their sides to cool, as pictured above. They can be stored for 3 days or frozen for future enjoyment.
As you may or may not know, I'm a big fan of a morning smoothie. Over the past eight months or so I have had a smoothie for most of my breakfasts. You may also know that I'm a sucker for a good time saver. In fact, if you are holding out some great time saving secret you better tell me because if I discover it and find out you knew about it all along, well I will be mighty disgruntled for at least three whole minutes.
I have evidence to support that claim, I truly do. When I was about 20, just trying to make everything work as a preschool teacher and a full time college student, I felt so overwhelmed by household duties. All that cleaning and cooking and bill paying was just dreadful. Cleaning was especially awful because of our horrible hard water. The ring in the bathtub was so incredibly disgusting. I had never seen anything like that nasty bathtub ring. At first I was sure something was wrong with the bathtub, not with my cleaning routine. When it finally dawned on me that the filthy, white and yet brown, rough ring around the tub was caused by my water and my washing, well I was infinitely grossed out.
I resolved to clean it up right quick and be done with it forever. I would be a preventative cleaner, proactive not reactive. I tried every cleaner I could reasonably afford. I used lemon juice and baking soda and all manner of household combinations. I even resorted to scrapping it with a soup spoon. In the end, that spoon was the only thing that left a dent- and that was more literal than figurative. I was near my wits end, almost a year of trying fruitlessly to clean this stubborn ring, when one of my coworkers just happened to mention her undying love for the mr. clean magic eraser. She proudly mentioned its wonderful ability to clean her bathroom to a sprightly shimmer. I could hardly believe her, I was so skeptical of the commercial's claims. I realize now that I should have been happy to hear this. Thrilled. Ecstatic. Enthralled. But my very first thought was that she had been holding out on me. She had this amazing secret and was scrubbing away her bathtub ring within minutes while I grabbed my trusty soup spoon and spent what felt like hours chipping away at those hard water deposits. About three minutes later, after much brooding and begrudgingly nodding as the conversation moved forward, I decided I had to try this thing out. I did and it was awesome and although I now buy the target version of this wondrous scrubber, I'm grateful for that conversation but now I know to ask in advance.
Speaking of asking, any ideas on how to get a floor to sweep itself? Or how to get Shelby to wipe her own paws after running through the muddy backyard?
Well, this is my newest trick and I'm here to share. My morning smoothie revamped. About a month or so ago I was tempted by the idea of buying a large case of Odwalla premade smoothies from Costco. I saw the big box of them and thought of all the time I would save each morning (about 3 minutes, yeah, seriously, three whole minutes my friend). Then I took one look at the ingredients (sugar! yikes!) and put that thought out of my mind. Instead, I decided to make an entire batch of smoothies for the week on that Sunday night. And I did just that. But by friday the top of my smoothie had a brown tint and tasted vaguely of bad bananas. Um. gross. You should have seen the look on my students' faces as I tried to swallow that initial Friday-old-banana-yuckiness. I must have had quite a look on my face too, it was a priceless moment. We laughed. I threw the smoothie away.
For the past few weeks I have been trying to figure out how to make the smoothies ahead of time but retain their fresh Monday/Tuesday look and taste. The answer was in my backyard: lemons. So simple!
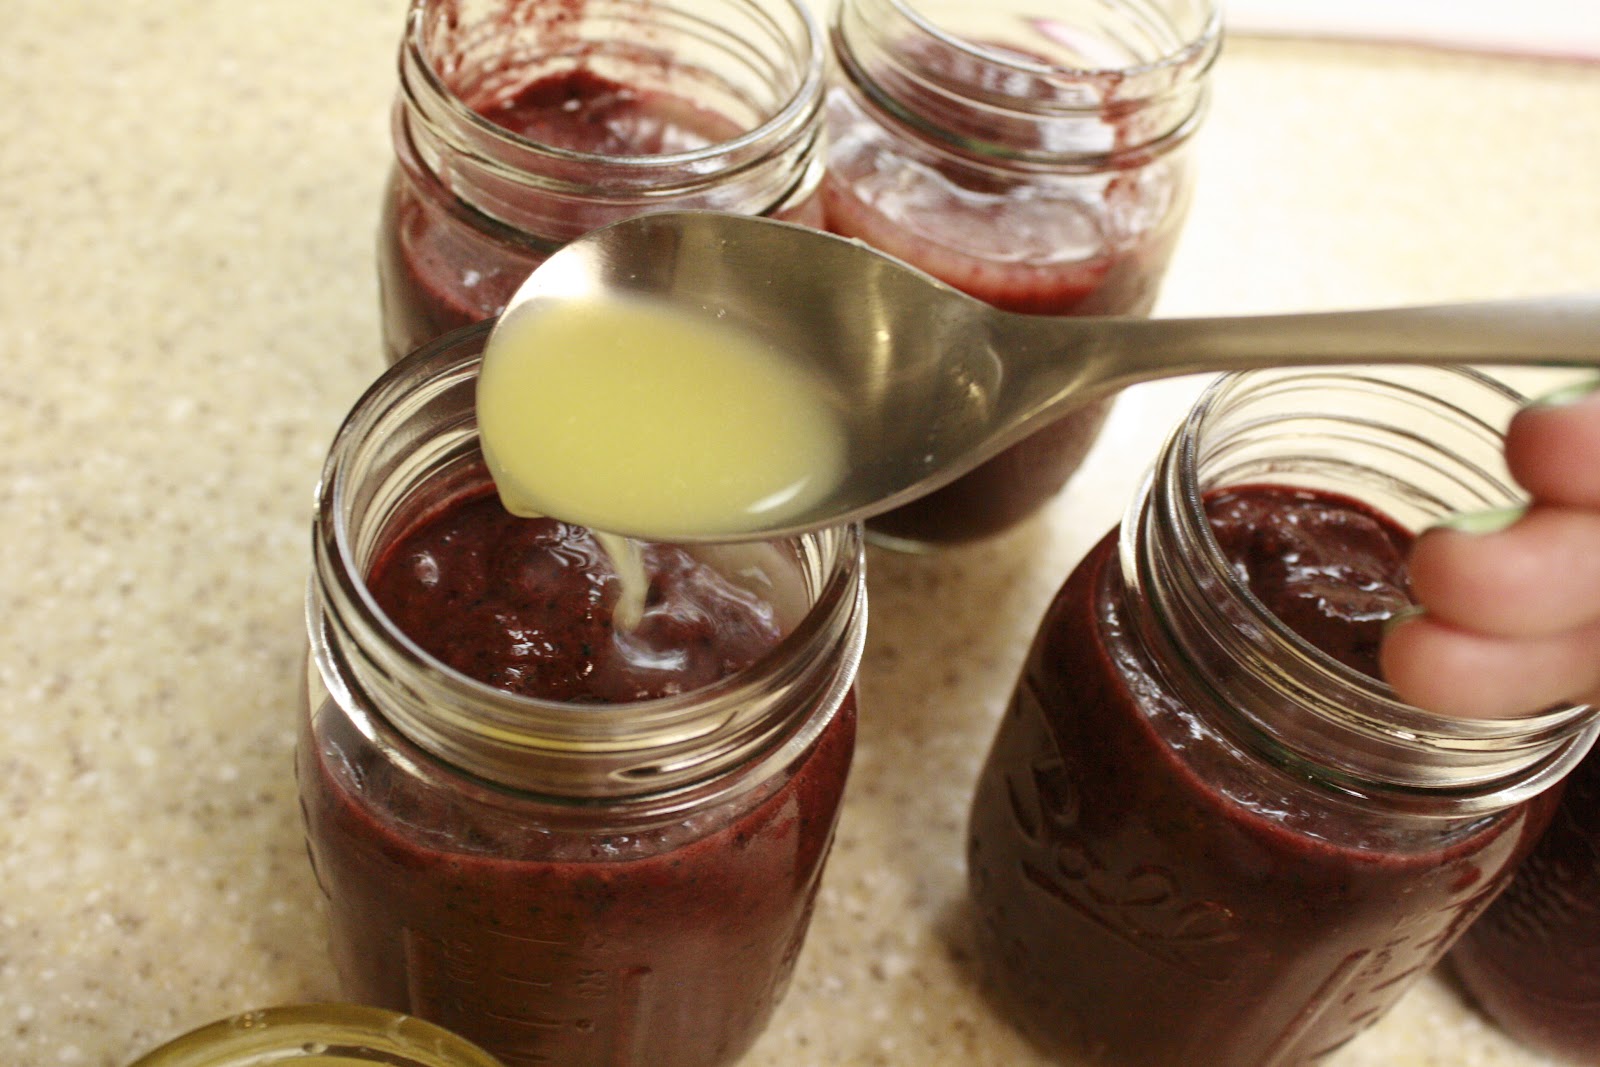
That's my freshly squeezed lemon juice in the jar up front. So many lemons, so little time..
Here's how I work it:
1) Fill up your blender with an assortment of fruit and maybe some greens. I prefer 3 fairly fresh bananas, about one bag of frozen berries, 1/3 bag of frozen spinach and some blueberries.
2) Pour in some liquid, about halfway filling up the blender. I used some beet/carrot juice and some pomegranate juice and a little citrus juice of your choice.
3) Let it sit for a bit, an hour or two, to make it easier to blend.
4) Get your jars ready!
5) Blend up the smoothie and pour equal amounts in each jar.
6) Pour about a tablespoon of lemon juice on the top of each smoothie before placing the lid on top.
7) Place them all in the fridge and enjoy three more minutes of blissful coffee sipping in the morning!
Tips:
1) I have found that using fresher bananas results in a fresher taste come Friday
2) Orange juice seems to work well in place of the lemon juice
3) Wash out the jar as soon as you get home, wooowweee does mold grow fast in those suckers
I have been making my smoothies each Sunday night this way for about three weeks and so far, so good. I added apples and pineapples and loved it. I also added coconut oil and did not love it. Live and learn!
I have a hard time with balance, not as in I fall down the stairs (though my wii fit thought I might, and said so frequently), but just within myself. I'm very critical of myself (aren't we all?) and I tend to think in terms of one thing versus another, right or wrong, healthy or unhealthy, runner or walker- there is no blurring of lines in my mind. Either it is, or I am, or it isn't, and I'm not. I'm realizing this makes my internal dialogue very bipolar and manic. One minute everything is great and I'm just dandy and the next minute everything I thought a minute ago is held in question.
For example, I am trying my best to eat nutritious, wholesome foods. I try to share those things with you. In those moments I feel successful and healthy. I'm pleased as punch with myself and I feel motivated to continue moving forward with all my healthy endeavors. If I find myself aimlessly munching on something with unidentifiable ingredients or, as happened this past week, an ooey gooey delicious fried food dipped in some amazing sauce, well then I just feel crummy and I become immediately 'unhealthy' and unkind to myself.
This is no big, unusual thing. I hear there are a lot of people who are, like me, harder on themselves than they would be to even their nemesis (though my particular nemesis would be a photocopy machine and I do think terrible, terrible things about it. I'm not sure what I think matters to that particularly menacing and minute munching machine. Though, if it could scream, I'm sure I'd take all those hateful ideas about stripping it for parts back.).
My number one new years resolution (it takes me a while to decide these things) is to be as kind to myself as I would be to others. I'm hoping to start that off by working on my sense of balance, taking the good with the bad and living with it all. Admitting that there is no grey area in my mind, and also admitting that in life things are often blurry and yet oddly balanced. Balance. A little bit of that grey area. It's what I think I need. A bit of everything and some well rounded expectations of myself.
Three ways: rolled in sugar (little guys), rolled in chocolate chip type things (big ones) and just a plain cookie.
These chocolate cookies represent a sort of off kilter yet lovely balance to me. Isn't that poetic and fortunate? They are devilshly delicious; deep and dark and chocolatey in the most amazing way. Yet, they are made with a whole grain- spelt flour- and are almost utterly unprocessed. Does that make them healthy? Oh goodness no. But I feel a sense of both whole grain goodness and amazing worthwhile tastes in these beauts.
The reaction to these cookies blew me away, I'm keeping them on my rotation and definitely bringing them around whenever I think a dark, intense chocolatey cookie would balance a situation out.
rolled in little chocolate chips, these were good, but sugar was better!
Chocolate Chocolate Cookies
adapted from Good to the Grain
ingredients
8 ounces (2 sticks) of unsalted butter
16 ounces of dark chocolate or bittersweet chocolate (70% cacao), split into two groups (one for melting and one for chunks in the dough)
4 eggs
2 1/4 cups granulated or raw sugar (plus extra for finishing)
2 cups spelt flour
1 tablespoon plus 1 teaspoon baking powder
2 teaspoons kosher salt
To begin, melt the butter and half of the chocolate (8 ounces) in a double boiler or a microwave until they are melted together and mixed well.
Next, add the eggs and the sugar to a large bowl, or the bowl of a mixer if you are so fortunate, and mix well (high speed) for 3 minutes until it gets thick. Mix the warm chocolate in and use a spatula to get all the chocolate and egg/sugar off the sides of the bowl.
Sift the dry ingredients into a bowl, pouring any leftover grains and bits back into the mix. Mix the dry ingredients with the chocolate mixture and stir well. Add the remaining chopped chocolate and continue mixing until everything is mixed well.
Refrigerate the dough for 2 hours and up to 3 days. When you are ready to bake, preheat the oven to 350 degrees and place parchment paper on your cookie sheets. Begin rolling the dough into large tablespoon sized balls, rolling them lightly in sugar before placing them on the cookie sheets. You can also roll them in cacao nibs, or leave them plain. I preferred the sugar.) Leave 2-3 inches between the cookies, as they will collide if you do not.
Bake the cookies for 15-19 minutes, until the edges are firm but the middle still soft. Cool on the parchment or a cooking rack.
Don't lie, you know you love bread. Anyone who says otherwise is lying. Sometimes we 'hate' bread because we have discovered that you really shouldn't eat it at every meal and well, especially for white breads or breads with a base of bleached, white flour, they aren't very nutritious on their own. Does that usually stop us? Sometimes, but not always. I know some people who have successfully given up almost entirely on eating bread and are healthier for it, but this is not one of those breads to hate. Or bread doughs, because it is so much more than bread.
I've decided- this is a bread to love. This is no summer fling bread. You can bring this bread home to momma. You love it and it loves you in return- because it has some good stuff in it and it tastes so darn good. And, it's flexible. It's not just bread dough- you can make anything bready and carby with it- they suggest hamburger buns. I suggest pizza. See below.
Liquids that will soon be poured into the tub above and mixed
I've talked about this type of bread before- the now pretty famous "5 minutes a day" type. I bought the "Healthy Bread in Five Minutes a Day" recently and have been trying it out. This is my new favorite- I added flax seed to it, just because I totally can, and I'm glad I did for a really silly reason. It's kind of pretty. It adds such a nice little fleck of color- I don't even really mind that it also adds some health benefits! Omega 3's- How about gorgeous contrast!
It's described as sandwich bread your kids will love and I chose to make it because the other recipes I had tried seemed like they needed something to fire back at the yeasty bite I was receiving-I thought a bit of honey would do the trick and when I stumbled upon this recipe in the cookbook, I was ecstatic.
This makes making bread so so easy. You just mix a few things, let it sit, then make a loaf and let it sit some more. Then bake and enjoy! The dough lasts in your fridge for up to 5 days. I highly suggest any of their books if you are even remotely intrigued and if you think you can't- then I think you must.
makes 2 (2lb) loaves (if making loaf bread) or 4 (12 inch) pizzas
5 cups whole wheat flour
2 cups all purpose flour
1/2 cup flaxseed meal (ground flax seed- you can buy it ground up or grind it up yourself- try the coffee grinder!)
1 tablespoon kosher salt (adjust to taste, and use less if you are using Morton's)
1/4 cup vital wheat gluten
2 1/2 cups warm water
1/2 cup honey
5 large eggs
2/3 cup melted unsalted butter (or use a neutral oil)
While the title suggests this will take only five minutes, the waiting time is much longer, the prep time is though- just five minutes. These are the steps, you will want to make this ahead of time.
Mix all the dry ingredients in a large bowl or a lidded (not air-tight) tupperware/food container. I use a large, rectangular container that used to hold granola bars in my pantry. Be sure to really stir this dry mixture around, getting the wheat gluten all mixed up with everything else.
Next, mix all the wet ingredients in a separate bowl and then pour them into the container with the dry ingredients. Mix this up well, getting all the dry stuff mixed in well. You may need to use wet hands to get it all.
And really, that is it for preparing the bread. That's the 5 minutes aspect of it, in my opinion. Now, let it sit with the lid on (or plastic wrap on the bowl, but don't make it air tight) and let it rise and collapse. Do not punch the dough down.
The dough can be used right away, or you can refrigerate it and use it over the next 5 days.
How do you want to use it?
Loaf of Delicious Bread:
Lightly grease a loaf pan (8x4ish). Dust the surface of the dough and pull off a cantaloupe sized piece (should be about half of the dough). Dust a little more flour on the top and quickly pull it into a ball, as they show you here:
It will be bigger than the ball he has here, and should fill your loaf pan about 3/4 of the way. Let it rest for 90 minutes in a warm place. I opted to put a little melted butter on the top of my loaf before baking it, just a note.
About 60-75 minutes into the resting, preheat the oven to 350 degrees. When the oven is preheated and the 90 minute rest period is up- bake the bread for 45-50 minutes, or until it is golden brown. Adjust your baking time if you made a smaller or larger loaf. Allow the bread to cool before serving.
Pizza:
Preheat the oven to 550 degrees (or 500 if that is the highest your oven will go) and place your baking stone near the bottom third of the oven. I use a terra cotta pot bottom for my baking stone- and have for years. Much cheaper!
Dust the surface of the dough and pull off a grapefruit sized piece, as shown in the video above, and shape it into a ball. Sprinkle some cornmeal or flour on your cutting board or pizza peel. Shape the pizza on the board/peel and top as you feel fit. Slide it into the oven (you may need a few shakes of the hand to wiggle it off the peel) and turn on the exhaust fan, because things will get a bit smokey with that flour or cornmeal flying into a hot oven.
Bake for 8-10 minutes, check it at 8 and go from there. Allow the pizza to cool a bit before serving.
When I was a goofy little kid, my sisters and I used to beg for frozen soft pretzels. Or, I think we did, because every time I pass them in the freezer section of the grocery store I think 'I want! You can't have! I want! You can't have!'.
Yes, sometimes we did slyly convince our parents to let us gobble some up. They were so satisfying and easy to heat up for a quick snack. It was such fun. Don't they remind you of a festival, theme park or other outdoor mildly summery gathering? They make me happy. Little bit of mustard, lots of napkins and a good sprinkling of salt and I'm in heaven. I love soft pretzels, but I had no idea how much I loved them until I had a fresh one at a farmers market a few years ago. Ever since then, those frozen ones haven't been on my mind at all. They don't tempt me the way they used to, not in the slightest. Nope. Not at all. (Am I convincing you?)
foamy yeast mixture
Then, last year, I found a recipe for them online and after reading through it, I decided that I had what it takes to make my very own soft pretzels from scratch. That first recipe was good, but it left me with an odd stomach ache and the pretzels weren't great the next day. I've been searching for a replacement ever since, and I have found it. I'm done searching. Hold off the hounds, here's the winner.
boiling- aren't those strange little bubbles?
If you are going to a super bowl party, or other festivities where major snacks are involved, I suggest you rock everyone's socks by making a batch of these. Seriously, everyone will think you are some sort of unicorn herding opera singer- that's how amazing they are! Don't tell me you wouldn't be impressed by that, or think it was unbelievable- because that is exactly what people will think when you bring these bad boys over! They won't believe you (hence the unicorns) and they will be amazed (hence the opera singing). My thinking totally makes sense now, doesn't it? Whip up a little cheese dip and you will have an absolute show stopper.
this is after their boil bath and before they were baked
Let me just mention this: These are way easy. Don't be fooled by the boiling step, it's easy peasy.
If you can mix some things, let them sit, kind of oddly fold things (or make pretzel sticks! Or pretzel bites! or what else? I'm dying to find other ways to use this recipe- I made pretzel rolls! Great for sandwiches or burgers!), toss said oddly folded things into boiling water for 30 seconds, take them out and bake them- then you are set. It's just that easy. I feel like I'm selling some cleaning product, but I don't know how else to say it- make. these. now. or at least soon. Then, thank me. Or thank Alton Brown, it is his fault after all.
1 1/2 cups warm (110 to 115 degrees F) water
1 tablespoon sugar
2 teaspoons kosher salt
1 package active dry yeast
22 ounces all-purpose flour, approximately 4 1/2 cups
2 ounces unsalted butter, melted
Vegetable oil, for pan
10 cups water
2/3 cup baking soda
1 large egg yolk beaten with 1 tablespoon water
Pretzel salt (optional)
Mix the water, sugar and kosher salt in
the bowl of a stand mixer, if you have one, and sprinkle the yeast on top. Let it sit for a bit, about 5 minutes, until it begins to foam. Then add the flour and butter and using the dough hook, mix it slowly until combined. (If you don't have stand mixer, no worries, mix it by hand! Work it!) Ramp it up to medium speed until the dough gets smooth and forms a ball- it should not be sticking to the sides of the bowl- about 4-5 minutes. Take the dough out and quickly clean the bowl, spray it with vegetable oil and return the dough to the bowl. Cover it with plastic wrap and put it in a warm place for about 50 minutes or until it has doubled in size.
Now, preheat the oven to 450 degrees. Line two sheet pans with parchment paper and a little vegetable oil.
Put the water and the baking soda in a large saucepan and bring it to a boil. While you wait for this, start working with the dough on an oiled surface. Divide it into 8 equal pieces for large pretzels, 16 for mini pretzels. Make a U-shape with the dough, then cross over each end to connect with the opposite side. Or make pretzel sticks, or rolls, or bites. Whatever you please! Just adjust baking time if you do.
Put the pretzels one by one into the boiling water for about 30 seconds each. Remove them using a slotted spoon or spatula and place them on the prepared sheet pans. Brush them with the egg yolk/water mixture and sprinkle with salt if you wish. Bake them until they are a dark brown color, about 12-14 minutes. Let cool for a few minutes before serving.

.JPG)
.JPG)